|
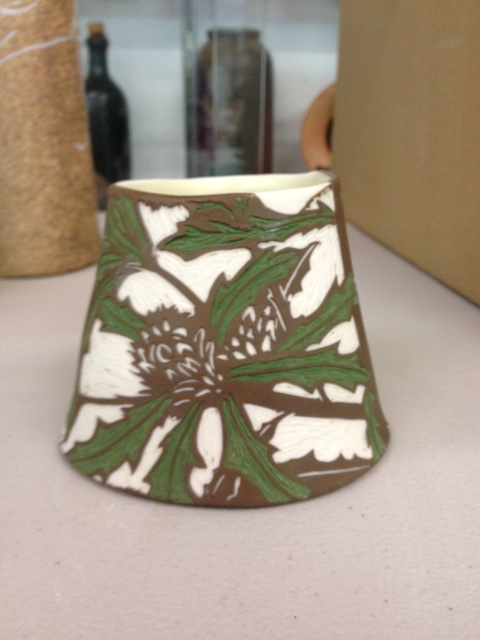
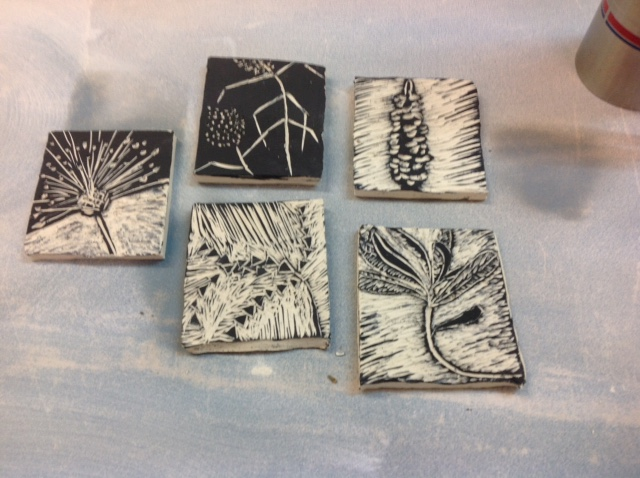
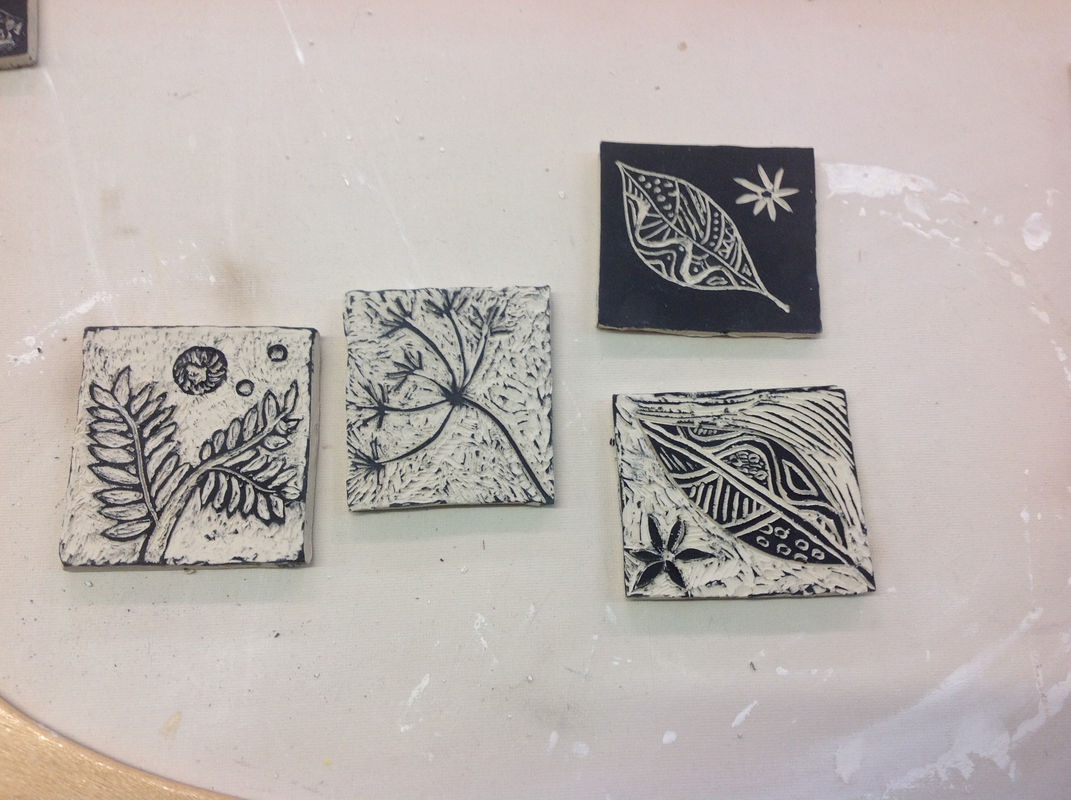
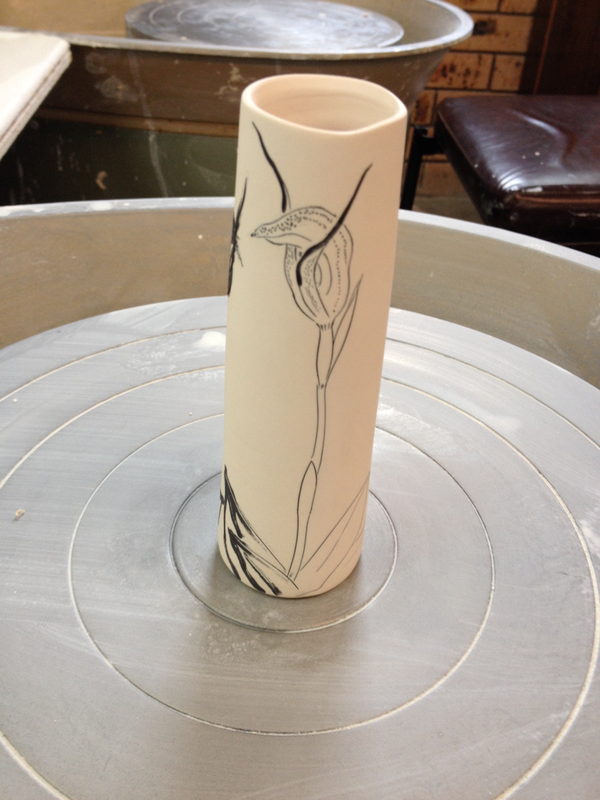
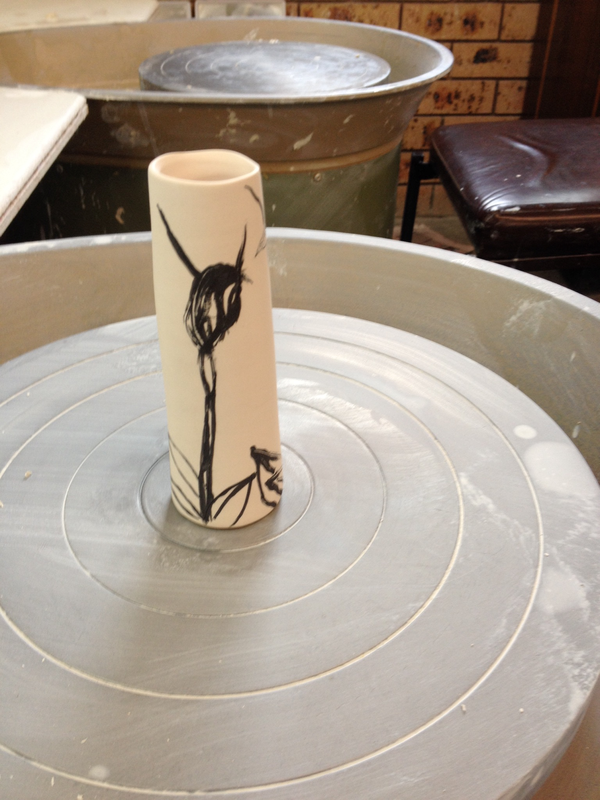
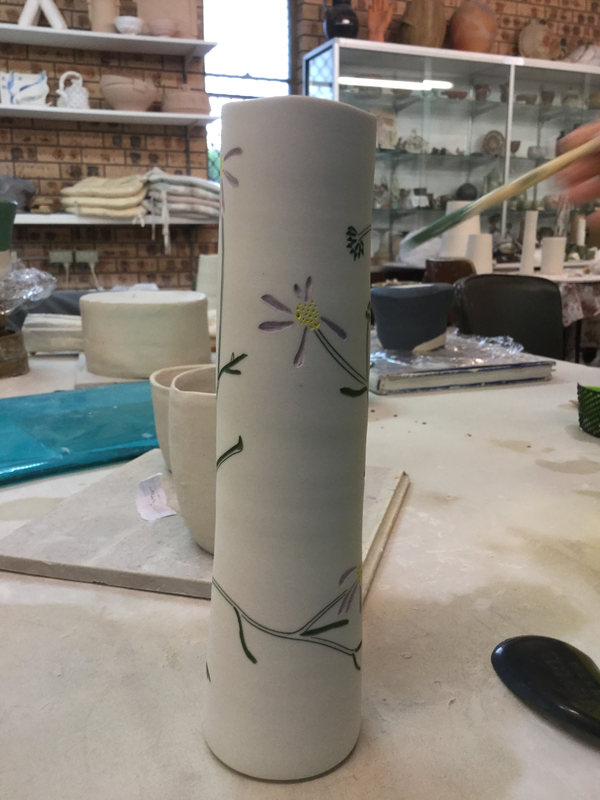
Report by Ingrid Tristram. Cathy Franzi stunned us with the beauty of her porcelain pots decorated with Australian botanical plants in a contemporary manner. Over the two days she helped us to make "walls" on the wheel and to distort these before adding a base. She showed us how to use slip and engobes for backgrounds for sgraffito decoration and how to use ink and slip for inlay designs. Cathy herself has recently completed a PhD at ANU. She has studied the local plants around Canberra where she now lives, including designs on her pots of the sixty two orchid species on Black Mountain! She has studied not only the history of plant design in ceramics but also researched botanical drawing from museums both here and internationally and is continuing to study plants in the field. Her ceramics reflect a scientific knowledge, an integration of form and design relating to inside and outside of her pots. We truly felt we were in the hands of an expert this weekend. After Cathy demonstrated her techniques, we all had a go at wheel throwing. We used Keane's Lumina clay which is a midfire glaze Cone 6 porcelain. She, herself, has been using the more expensive Limoges porcelain clay because it is a more creamy white and better for her purposes. We each made a collection of "wall" pieces of varying sizes from about 300g - 600g. She encouraged us to cone up the clay several times in order to smooth out any air bubbles or knots and make sure the clay was centred. Then we opened the clay right down to the wheel head and outwards with one finger leaving the slightest edge of clay inside at the base for joining to a base later. We cleaned clay off the centre of the wheel head. We did not cut the "wall" off the batt at this stage. Later we made bases for our "walls". For this we patted a smallish lump of clay to a cow pat kind of size before rolling it out. Cathy explained that porcelain prefers to be patted rather than pulled. We used wooden guides to help us roll the clay slab evenly. We placed the slab on a batt. We used a rubber kidney to smooth the surface. We placed wet cloth on the smooth slab and made sure there were no wrinkles on the material. Silk is good because it doesn't leave a texture. We placed another batt on the slab covered with cloth and turned it over. Removing the batt now on top, it exposed the raw other side of the slab which we could smooth with water and a rubber kidney. Cathy really liked the variety of mud tool kidneys which are of different stiffnesses and she used them for smoothing the porcelain.Now the slab was ready for the "wall". The cloth is left at this stage under the base of the slab. Next we altered and attached "walls". We put a splash of water around the "wall" of our thrown piece that was still on the batt where we had thrown it and NOT released by a wire. Now we cut the "wall" with a wire and slid it and formed the asymmetrical shape we desired. Then we lifted it onto the prepared base and cut the base slab to fit allowing a small margin to work from the base to the "wall" to join. No scoring of this evenly wet clay was necessary. The small margin left in the throwing on the inside could likewise be joined with a rubber kidney or wooden tool or fingers. The pots were fairly roughly joined and put outside to firm up. Cathy also demonstrated how to throw and join two pots or more in her case. Those who wished, threw two pots for joining later. The first with a base and the second without a base. The rim at the top of the first pot was curved in. The rim of the second pot was curved out so when inverted, the two pots fitted together. Neither pot was cut off the batt. They were put outside to dry, however, care was taken to cover the rim with glad wrap to prevent uneven drying. The following day, the first pot with the base was re-centered on the wheel. Each rim was scored with a toothbrush and a small coil of clay added. The second pot was inverted and placed on top. Only then was the top pot wired off. Now your hand could reach in and throw up and down to consolidate this join. A fine coil of clay was placed on the outside join and further throwing compressed the join until it could not be seen. The second day Cathy demonstrated her her turning technique. She turned her cylinder with deep spiral throwing lines and we turned our joined pots until they were fine and smooth. We also smoothed our asymmetrical walled pots ready for decorating. On the first day Cathy discussed methods of decorating. She had reference books of Lino cut designs, for example: Col Minogue, Impressed and Incised Ceramics; Pauline Green (Editor), Printed Images by Australian Artists 1885 - 1955; and Mathias Osterman, The Ceramic Surface. Cathy had brought a selection of her own pots which were beautiful to handle and we could see both the sgraffito and incised surfaces. She likes to use a scalpel or tool that doesn't leave residual clay in the groove. Incise deeply enough to take the ink. She likes to make her own tools from three cornered wood beaded strips from Bunnings chopped up to pen lengths with a slit made at one end. She cuts strips off a metal kidney which she bends to make a loop or V or whatever shape you like, then it is glued into the slit with araldyte. We all made one for ourselves.The lovely organisers of the workshop had pre-made leather hard tiles coated with a black slip. We were able to experiment with trying a variety of sgraffito marks: lines and textures,and also playing with black shapes on white and white on black. Cathy prefers to draw directly onto the pot without first drawing. She demonstrated inlaying with Kera ink. Kera underglaze ink can be bought online from Pottery Supplies, Brisbane. When a pot is bisqued, submerge it in water and use wet and dry sandpaper, about 400 grade, to smooth it and take off excess ink. After the final firing you can use 800 and 1200 wet and dry sandpaper. She also uses slips into incised lines. With slip it is necessary to overfill he incised line to allow shrinkage as the water content dries off. Colorants can be added to slips. Cathy suggested 10% stain, and 5% Frit 4110 added to the slip. She added 25g to 250 mls slip so using wet and dry measurements OK. Once a slip has some glaze materials added to it, it becomes an engobe. Cathy has developed her own engobes that give the sheen she likes but as a starting point here are two recipes: Cone 6 1200 degrees C. Midfire. White 30%. Kaolin 30%. Ball Clay 20%. Potash Feldspar 10%. Silica10%. 10%. Zirconium Silicate Cone 01- 1 1140 - 1150 degrees C. 80%. Ball Clay 20%. Molochite ( which is calcined Kaolin) 10%. Frit eg. 4193 Finally Kylie Rose quickly went around the group requesting comments on the workshop and you can see how much Cathy Franzi's workshop was appreciated. Clodagh: Valued consolidating techniques for joining porcelain pots on the wheel Denise: Learned about inlay techniques Lynne: Re-ignited interest in fine work Shirley: Loved cutting and altering forms Annette: Appreciated making shapes from altering forms and 2D design working with background and foreground Jasmine: Sharing ideas with everybody such as in the tiles we decorated Sandy: By treating porcelain not so preciously it took the scaryness out of it. Appreciated the love of Australian plants and unusual to see native plants on pots in a more contemporary way Carol: Could see how other skills, such as, drawing and the use of colour, could be combined in this process."........pure pleasure Virginia: Valued the appreciation of our plants and endangered species, realisation of a dream to value what we have more.......thank you Kylie Rose: Noted that there was an intellectual engagement in the scope of ideas and the process I hope I have not misrepresented the verbal comments but Clodagh also summed up what we all thought by recognising the holistic approach where Cathy considered design, beauty and meaning of her pots. Cathy's pots are of environmental significance based in a knowledge of history and what is happening in our contemporary world. Thank you so much Cathy! Pictures by Ingrid Tristram.
0 Comments
Leave a Reply. |
Welcome to the CCPS blog!Central Coast Potters Society is a non-profit, community organisation of like-minded volunteers who love clay. Categories
All
Archives
November 2018
|


 RSS Feed
Central Coast Potters Society
|
Workshop
10a Russell Drysdale Street East Gosford, NSW, 2250 |